OpenShift 4 UPI Bare-Metal Installation (Air-Gapped, Disconnected)
This is a real-world deployment of an OpenShift 4.x cluster using the User-Provisioned Infrastructure (UPI) method on vSphere in a fully air-gapped (disconnected) environment. The installation was completed without any internet access inside the cluster network, using mirrored images and packages transferred via USB drives into the internal network.
Cluster Topology
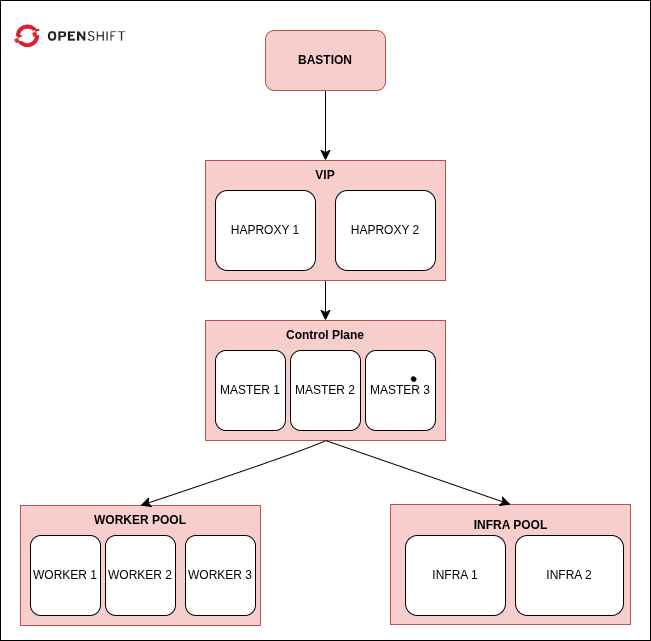
- 1 Bastion Node (external + internal)
- 1 Bootstrap Node
- 3 Master Nodes
- 3 Worker Nodes
- 2 Infra Nodes (labeled workers)
- 2 HAProxy Nodes for external load balancing and high availability
Each node had static IP addresses in the 192.168.66.0/24 range.
Tools and Dependencies
- OpenShift tools: openshift-install, oc, and kubectl
- All required container images mirrored using oc mirror
- Internal container registry deployed using Project Quay’s web-based config container
- RHEL packages downloaded with reposync and turned into an internal YUM repo
- Apache HTTP server to serve Ignition configs
- Bind for DNS
- HAProxy nodes for API and Ingress load balancing with high availability
- Keepalived for VIP failover between HAProxy nodes
- Custom certificates for HAProxy frontends (verified with an internal CA)
- Special DNS names for Ingress, the OpenShift API, and cluster applications like the web console (provided by internal IT department)
All dependencies were mirrored outside the closed network and moved into it via USB drives.
Mirror Registry Setup (Air-Gapped, Quay UI-Based)
To support the disconnected installation, we mirrored OpenShift content in a connected environment using oc mirror, transferred the content via USB into the internal network, and deployed a local container registry using Project Quay’s UI-based config container.
Process Overview
- In the connected environment:
- Ran
oc mirror --dest-dir=ocp-mirror \ quay.io/openshift-release-dev/ocp-release:4.12.10-x86_64 \ --docker-config-json=pull-secret.json - Saved the Quay image:
podman pull quay.io/projectquay/quay
podman save -o quay.tar quay.io/projectquay/quay
- Ran
Moved all data (mirror archive + quay image) into the air-gapped network via USB.
- In the air-gapped environment:
- Loaded the Quay image:
podman load -i quay.tar
- Loaded the Quay image:
- Started the Quay config container:
podman run -d --name quay-config -p 8080:8080 quay.io/projectquay/quay config secret-pass Opened http://
:8080 in a browser and logged in as quayconfig / secret-pass Completed the web-based setup (DB, storage, credentials) and downloaded quay-config.tar.gz
- Deployed the actual registry:
mkdir -p quay/{config,storage} tar -xzvf quay-config.tar.gz -C quay/config podman run -d --rm --name quay -p 5000:8443 -v $PWD/quay/config:/conf/stack:Z -v $PWD/quay/storage:/datastorage:Z quay.io/projectquay/quay:latest - Finally, mirrored into it:
oc mirror --from=./ocp-mirror docker://localhost:5000
Once the cluster was installed, the temporary local Quay registry was removed.
Infrastructure Services
All supporting services were manually deployed:
- Apache HTTP (httpd) served Ignition files over port 8080
- DNS forward and reverse zones, including special records for the OpenShift API, Ingress, and applications, were provided by the internal IT team.
- Two HAProxy nodes were deployed for external API and Ingress load balancing with high availability
- Keepalived handled virtual IP failover between the HAProxy nodes
- Custom certificates were generated and configured on the HAProxy frontends to secure API and Ingress traffic
- Chrony provided internal NTP synchronization
- All IP addresses were manually configured on each node using
nmtui; no DHCP server was used.
Installation Flow
Step 1: Generate Install Configuration
openshift-install create install-config
openshift-install create manifests
openshift-install create ignition-configs
Copy .ign files to Apache directory:
cp *.ign /var/www/html/
chmod a+r /var/www/html/*.ign
Step 2: Bootstrap Node
coreos-installer install --copy-network --insecure-ignition \
  --ignition-url=http://<bastion>:8080/bootstrap.ign /dev/sda
Then from Bastion:
openshift-install --dir=./ wait-for bootstrap-complete
Step 3: Masters
coreos-installer install --copy-network --insecure-ignition \
  --ignition-url=http://<bastion>:8080/master.ign /dev/sda
After all 3 masters are up:
openshift-install --dir=./ wait-for install-complete
Step 4: Workers and Infra Nodes
Same procedure with worker.ign:
coreos-installer install --copy-network --insecure-ignition \
  --ignition-url=http://<bastion>:8080/worker.ign /dev/sda
Then (for infra nodes):
oc label node <node-name> node-role.kubernetes.io/infra=""
Step 5: Reuse Bootstrap Node (Optional)
If reusing bootstrap as worker:
oc delete node <bootstrap-name>
coreos-installer install --copy-network \
  --ignition-url=http://<bastion>:8080/worker.ign /dev/sda
Step 6: Configure HAProxy Nodes
After cluster nodes were online, two dedicated HAProxy nodes were configured to provide external load balancing for the OpenShift API and Ingress. Keepalived was set up on both HAProxy nodes for virtual IP failover. Certificates were generated and deployed to secure external connections.
Cluster Boot Behavior
- The bootstrap node temporarily runs etcd, the API server, and initial operators.
- Once the masters are healthy, ownership of the control plane is handed over.
- The bootstrap node is no longer needed and can be wiped or repurposed.
Node Specifications
| Role | RAM | Disk |
|---|---|---|
| Master | 16 GB | 500 GB |
| Worker | 8 GB | 100 GB |
| Infra | 8 GB | 100 GB |
| Bootstrap | 8 GB | 100 GB |
| Bastion | 8 GB | 100 GB |
| HAProxy | 8 GB | 100 GB |
Based On
This deployment was based on an internal OpenShift UPI, Air-Gap, vSphere guide, compiled from a series of practical instructions and private support materials provided by Red Hat.
- Registry mirroring
- Apache + DNS + HA setup
- Two-node HAProxy load balancing and VIP failover for external reachability
- Custom DNS names for OpenShift Ingress, API, and cluster applications
- Certificate generation and trust configuration for secure external access
- Fully air-gapped installation and manual day-one validation